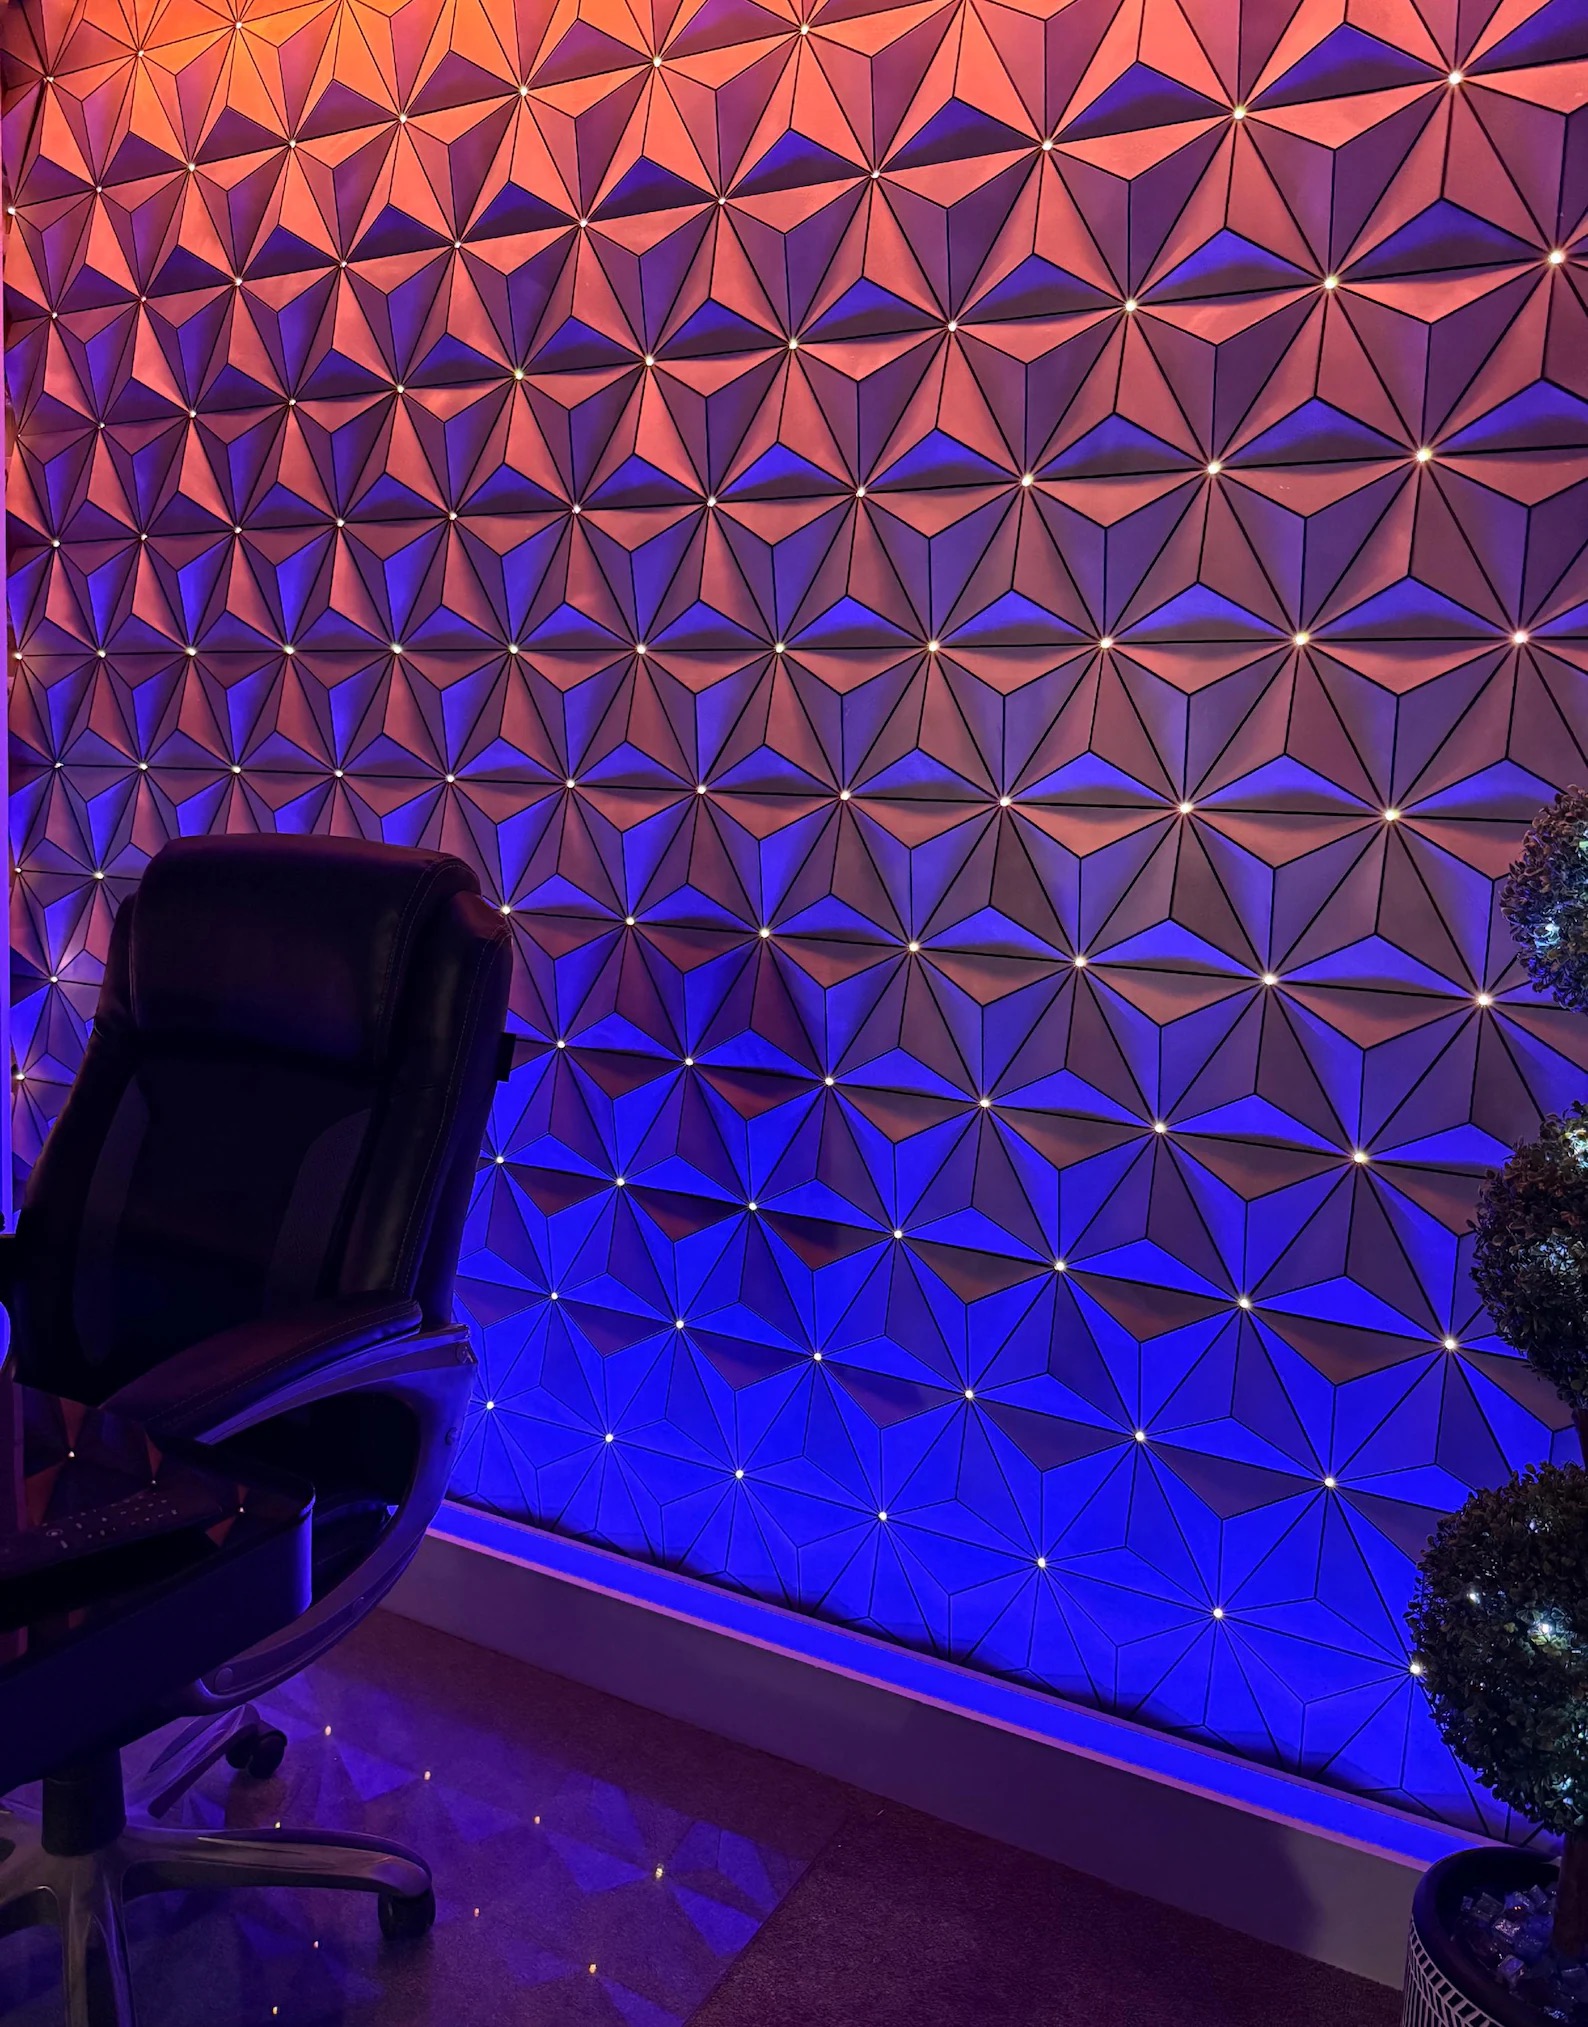
A little of EPCOT can follow you home—and cover an entire wall. Bryan Bouldin, the creator behind BINGOT Creative Works, designed the Grand and Miraculous Wall System: a modular, 3D-printed wall inspired by Spaceship Earth, with lighting that turns its raised geometry into a show.
This is Bryan’s design and product. He sells the digital builder package through his own shop. If you want to build one, buy Bryan’s printing files and builder guide on Etsy. The purchase is a digital download; you supply the printer, materials, hardware and work.
The appeal is easy to understand once you see it running. But building a wall means making several choices before the first tile comes off the printer. Here is the story behind Bryan’s project, a showcase of his work and a community build, and what to consider before starting your own.
Start with the finished show
For the clearest introduction, watch Bryan’s video of the EPCOT 40th Anniversary Beacons of Magic show on his wall. The video below comes from BINGOT Creative Works’ own YouTube channel. The wall design and home installation are Bryan’s work; the Disney show that inspires the presentation remains Disney’s.
Video: BINGOT Creative Works. Watch the original 40th anniversary wall show.
Notice the relationship between the bright points and the faces around them. The geometry gives the light a surface to work across. That combination is what makes this more interesting than hanging a strand of lights around an office: the wall itself becomes part of the effect.
It also helps explain the attraction connection. Our Spaceship Earth attraction guide covers the ride inside EPCOT’s geodesic sphere. Bryan’s home project takes its visual cue from the landmark’s exterior, rather than trying to reproduce the ride.
Why Bryan wanted a piece of EPCOT at home
In their Men of Main Street interview with Bryan, hosts Nick Wattendorf and Jeremie Harnois explored how the project began. The background in this section comes from their published interview. THMPRK did not conduct the interview.
Bryan described being drawn to EPCOT since childhood and wanting to enjoy a piece of it between visits. An unfinished basement gave him space to create an office from the ground up. He had seen painted Spaceship Earth walls, but wanted to explore a dimensional version.
He told the hosts that he began without experience in 3D printing or LED lighting. There were failed parts and a mounting approach he had to tear down. A magnet sticking to a steel framing member during a hardware-store visit helped unlock the solution. The polished wall came through repeated attempts, rather than a ready-made plan.
Even the shop name connects to the room. Bryan explained BINGOT as Bryan’s Innovative Next Generation Office of Tomorrow, incorporating his call sign, Bingo. He also credited Don, known as Gwing DMC, for help with WLED lighting and early testing. His goal included a community that could share lighting ideas.
Watch Nick and Jeremie’s full conversation with Bryan, starting around 26:37, for their reporting and his account in his own words.
What you are buying from his Etsy shop
According to Bryan’s builder-package listing, the download includes STL files for printing and a PDF guide covering materials, framing, assembly, magnets and finishing. A two-piece tile option separates the face from the base. Check the listing for the current package contents and price before buying.
The distinction matters for planning: purchasing the files starts the project. It does not deliver a box of finished wall panels or a fully assembled lighting system. You will need a 3D printer, filament, framing materials, magnets, compatible LED pixels and a controller, along with the tools for the build.
The listing’s license is for personal use. It does not permit sharing or reselling the files or selling printed parts. Support the creator by sending other prospective builders to his shop.
 BINGOT Creative Works
See the build beneath the finished surface
Bryan’s own channel makes a useful companion to the listing. The videos below cover different stages, so you can look at the structure and finish before deciding how much wall to take on.
The frame comes first
His initial framing video is a useful place to start. A finished light show can make it tempting to think only about colors. Spend time on the support structure first: the size and location of the installation set the boundaries for everything that follows.
Video: BINGOT Creative Works. Initial framing.
Before committing to a full installation, measure the intended space and look at it as a room. Where are the door, desk, outlets and furniture? Where will the controller go? How will you reach the equipment later? These are planning questions to answer with Bryan’s guide in hand, before ordering a large batch of materials.
Choose a tile finish deliberately
Compare Bryan’s tile paint and finish video with his two-piece tile design update. They give you two useful points to investigate: how you want the faces to look, and which construction approach fits your equipment and preferred workflow.
Video: BINGOT Creative Works. Two-piece tile design update.
A sensible first milestone is a small sample, using the method in the current builder guide. Look at it where the wall will actually sit. Check the finish in room light as well as with the planned lighting. A sample gives you something concrete to judge before repeating the same choice across a much larger surface.
Treat lighting as its own stage
Bryan also publishes a dedicated lighting tutorial. Watch that before assuming that the finished 40th anniversary presentation arrives ready to play with the printing files. The Etsy listing describes a construction-focused package, with additional lighting guidance through his community channels.
Video: BINGOT Creative Works. Lighting tutorial 1.
Keep three goals separate when planning: a wall that looks right in daylight, lighting effects you enjoy on their own, and a timed presentation. You can work toward them in stages. Follow the current component instructions and Bryan’s build guidance for the actual installation, rather than treating this feature as a wiring manual.
A community build, with its builder credited
The system is also becoming a starting point for other makers. In the original post embedded below, BINGOT Creative Works and @lodavigo show a build in progress. Bryan’s caption identifies @lodavigo as the builder and describes a two-color print made with a Snapmaker U1.
Original post: BINGOT Creative Works and @lodavigo. Build in progress by @lodavigo, using Bryan’s wall system. Open the original post to browse the carousel if the embed is unavailable.
This is a work in progress, rather than a claim that a second finished wall is on display. It offers a useful comparison with Bryan’s installation: the same system can lead a builder to investigate a different printing workflow. The original post keeps that maker’s work and credit together.
For more of Bryan’s projects beyond the wall, his classic EPCOT logo project post and Instagram profile offer further examples. Those are separate projects; check their individual sources and terms rather than assuming they are included in the wall package.
Plan your version before filling the print queue
The useful question is how much of this project you want to take on. If you enjoy making, finishing and learning a lighting system, those stages can be part of the appeal. If you mainly want an instant room makeover, read the builder-package description carefully before committing.
Make a short project plan with four lines: the area you want to cover, the materials you need, the printing capacity you have, and the finish you want to achieve. Keep the price of the digital files separate from the physical build budget. There is no single honest total for every room or printer.
Then give the project a small first checkpoint. Review Bryan’s instructions, make the recommended test pieces, and decide whether the result suits your space. A whole wall is a striking destination. A successful sample is a useful first step.
Ready to start? Buy the Grand and Miraculous Wall System files directly from Bryan’s BINGOT Creative Works Etsy shop, and follow his YouTube channel for the build videos. Bryan created the system; his work is the reason this project is possible.
1 thumbs up0 thumbs down
Was it useful? Pick a thumb.
Guides & stories
Keep the good ideas coming.
A few next reads to help with the choices ahead.

For the places you’re exploring
Choosing Your First Orlando Park Trip: A Practical Framework
Orlando offers more choices than one first trip can hold. Compare the resort structure, park worlds, travel, and time you can actually use, then build a smaller plan with a clear purpose.
Read article
For the places you’re exploring
A slower EPCOT day: shows, food and World Showcase
Make EPCOT’s films, galleries, food and country settings the substance of the day. Follow a flexible western World Showcase route with separate rest time, selected performances and an optional evening or earlier finish.
Read day plan
For the places you’re exploring
EPCOT for ride lovers: a flexible day around the headliners
Choose the EPCOT rides that matter most, compare their different formats and connect them with meals and a genuine rest. This flexible route prioritizes World Discovery, The Land and one later World Showcase headliner.
Read day plan